Unity GPU Instancing
运行环境:Unity 2018.3.2f1
Unity 提供了Static Batching和Dynamic Batching两种方式来优化渲染性能。
-
Static Batching
Static Batching会在Build阶段提取多个使用相同材质的,且不会移动,旋转和缩放模型的Vertex buffer和Index buffer。然后将顶点数据变换到世界空间下,存储到最终Static Batching所使用的Vertex buffer中,并记录每个子模型的Index buffer在Static Batching所使用的Index buffer中的位置。在绘制阶段,会一次性提交合并后的模型顶点数据,最终引擎会根据子模型的可见性确定需要绘制的子模型,设置一次渲染状态,再调用多次Draw Call分别绘制子模型。
所以Static Batching并没有减少Draw Call的数量,但在绘制阶段避免了多次数据提交和渲染状态的切换。
-
Dynamic Batching
Dynamic Batching会在运行时将使用同一材质的模型进行合并渲染,也就是将符合条件的GameObject放在一个Draw Call中绘制。使用Dynamic Batching有一些限制:
- 模型最高900个顶点属性,300个顶点。假如我们的Shader中每个顶点使用了Position, Normal, UV,那么模型只能有300个顶点。如果在Shader中使用了Position, Normal, UV0, UV1, Tangent,那么顶点数就要减少到180个(5*180=900)。
- GameObject之间有镜像变换的不能进行合批
- 使用Multi-pass Shader的GameObject禁止合批
- 拥有lightmap的对象,无法合批
- GameObject接收实时阴影无法合批
Dynamic Batching在降低Draw Call的同时会导致额外的CPU性能消耗,所以仅在合批操作的性能消耗小于不合批,Dynamic Batching才有意义。
1.1 动态合批
-
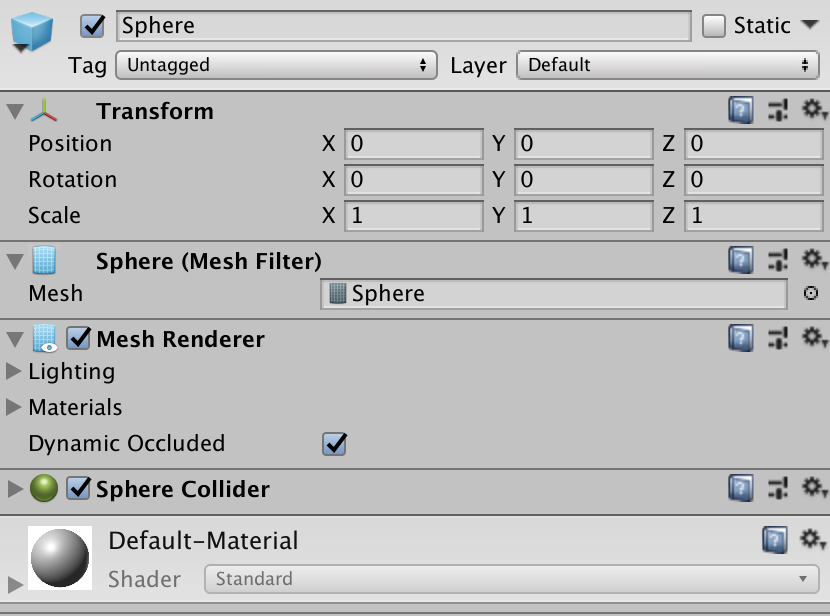
新建一个球体的Prefab用于测试
-
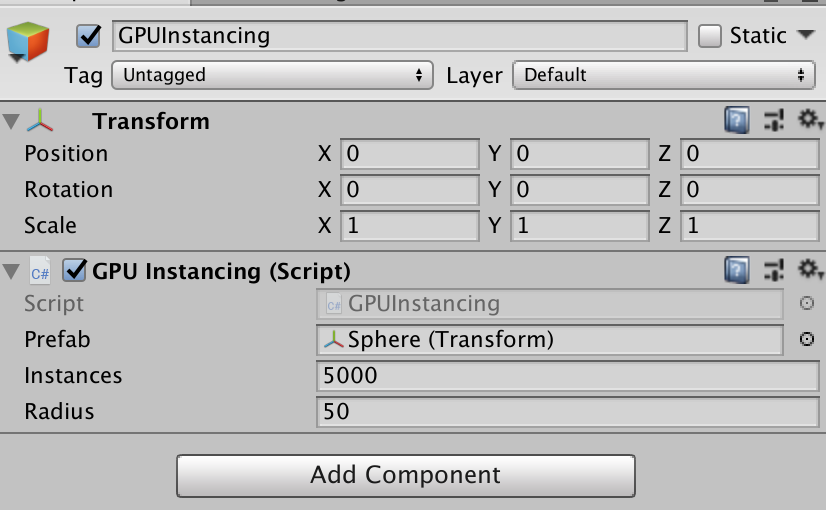
新建GPUInstancing脚本,用于生成Sphere实例
using System.Collections; using System.Collections.Generic; using UnityEngine; public class GPUInstancing : MonoBehaviour { public Transform prefab; public int instances = 5000; public float radius = 50f; void Start() { for (int i = 0; i < instances; i++) { Transform t = Instantiate(prefab); t.localPosition = Random.insideUnitSphere * radius; t.SetParent(transform); } } } -
新建GameObject并添加脚本GPUInstancing,生成半径50,实例数5000。
-
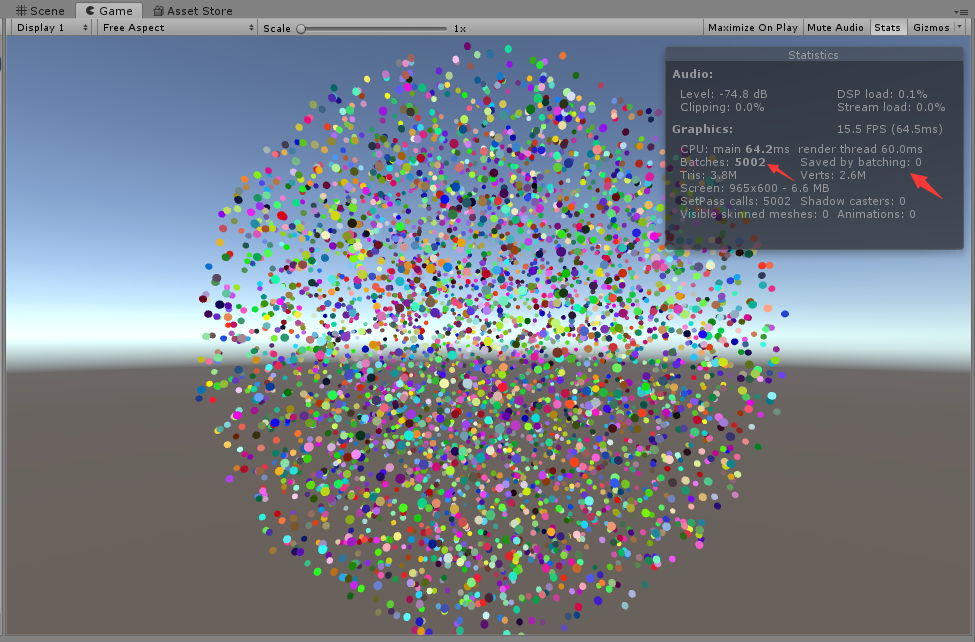
将相机位置设置在(0,0,-100)以保证所有物体均在视野范围内。关掉光源的Shadow,设置相机的渲染路径为Forward Rendering。
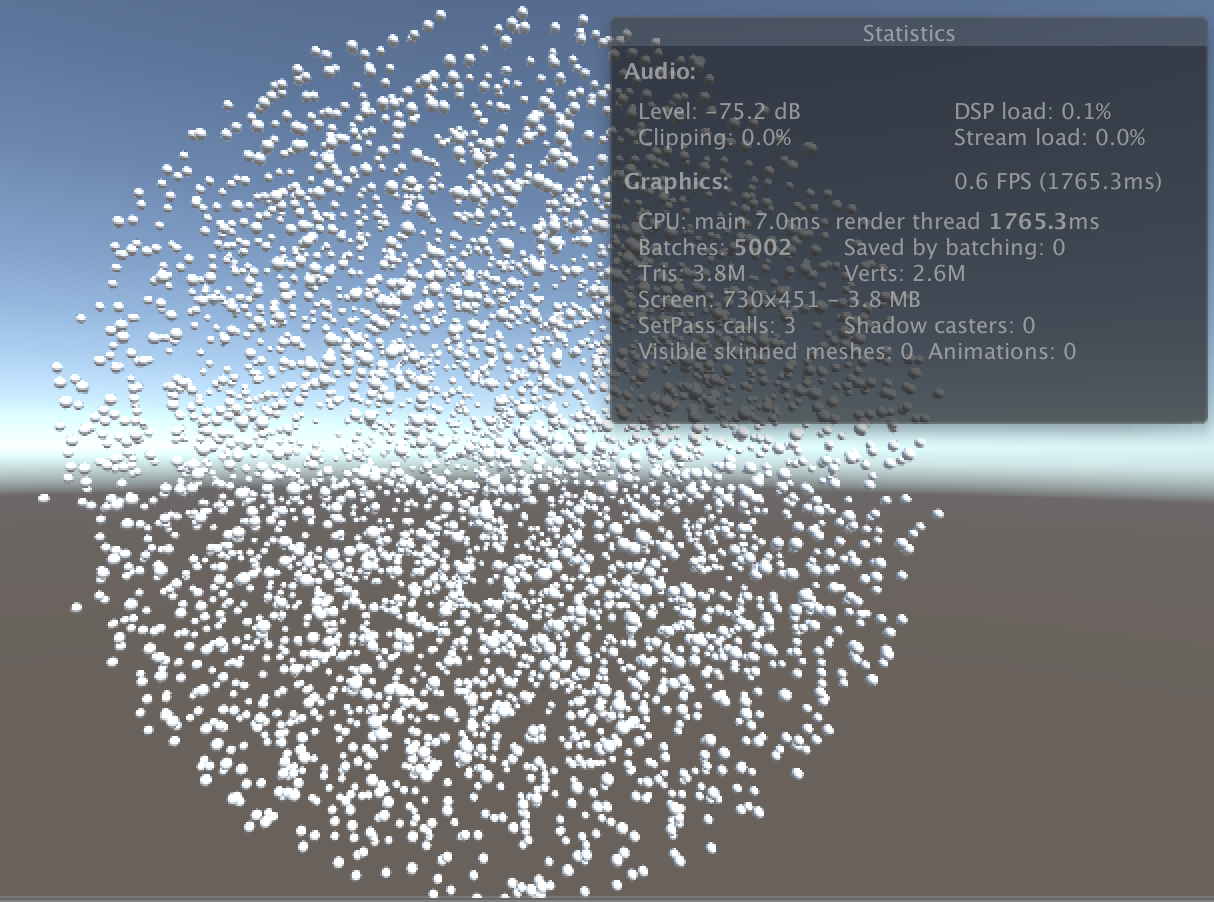
可以看到总共有5002次DrawCall(Batches),其中5000次是场景中的球体的绘制。尽管开启了动态合批,但由于Sphere的模型过大,导致无法动态合批。而且FPS只有0.6
-
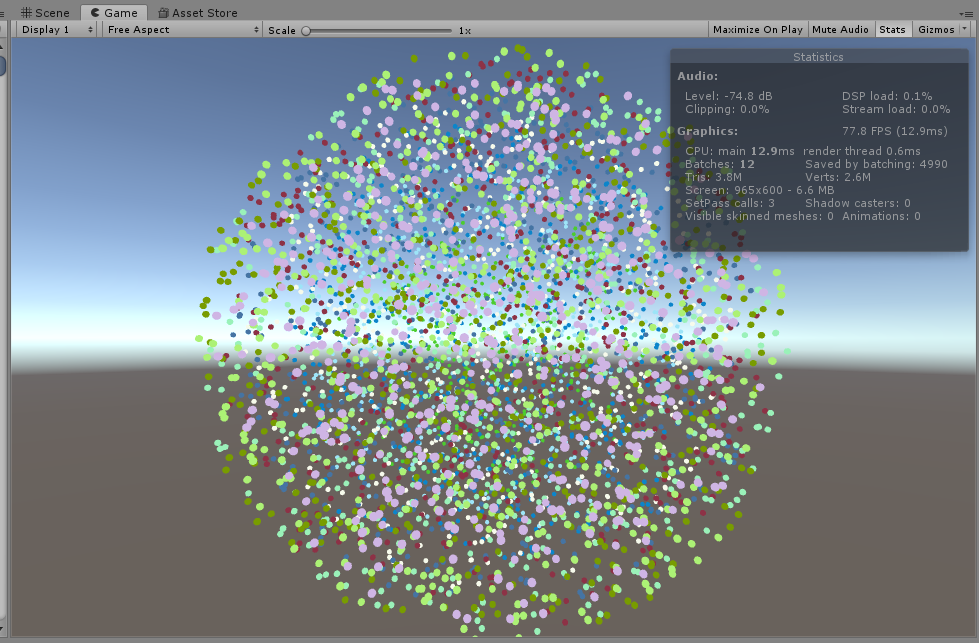
将Sphere替换为Cube,观察合批结果
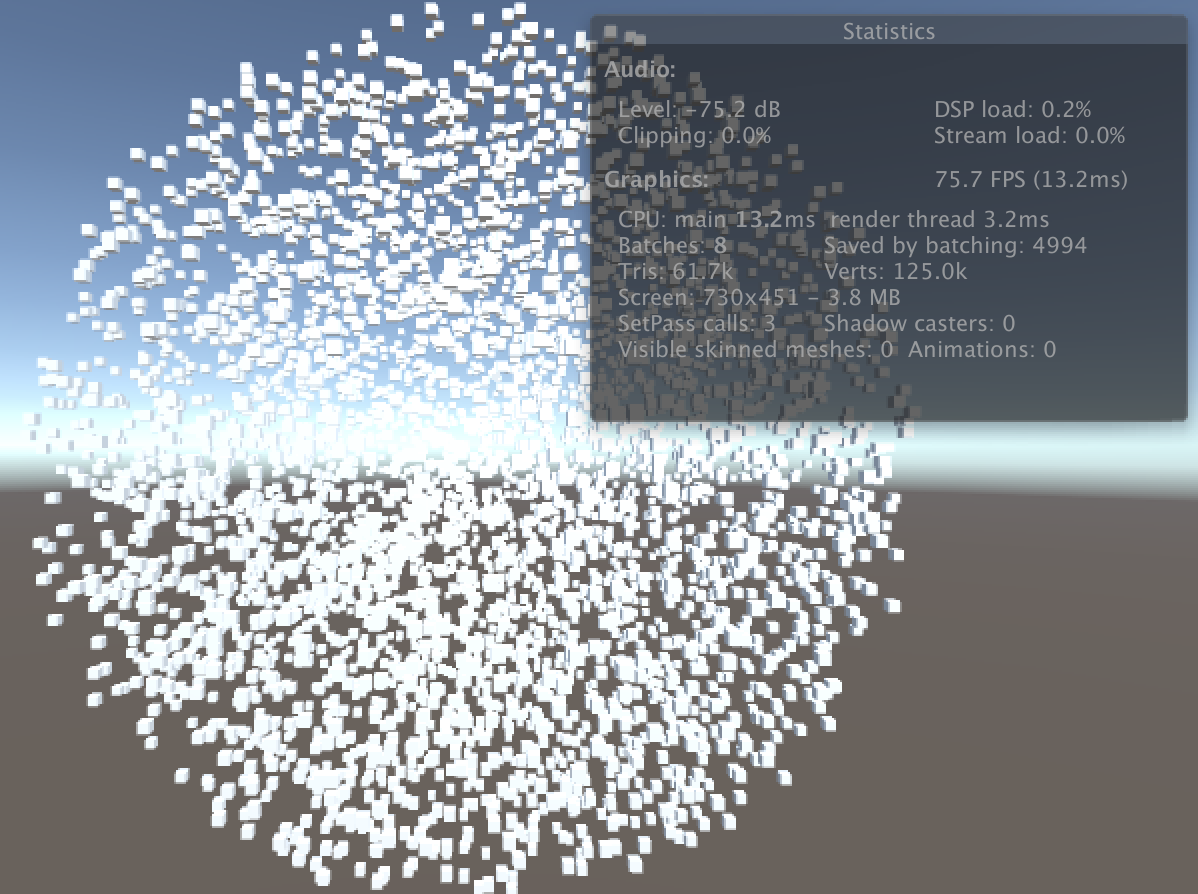
可以看到这时只有8次DrawCall(Batches),4994个Cube被动态合批了。FPS也从0.6fps上升到了75fps。
1.2 GPU Instancing 测试
GPU Instancing 并不是默认开启的。Shader需要特殊处理才能支持GPU Instancing。Unity的standard shader中是有开启GPU Instancing选项的,如果是自定义Shader,就需要自己去处理。我们先来用Sphere的渲染来测试下,5000个Sphere不开启GUP Instancing的情况:
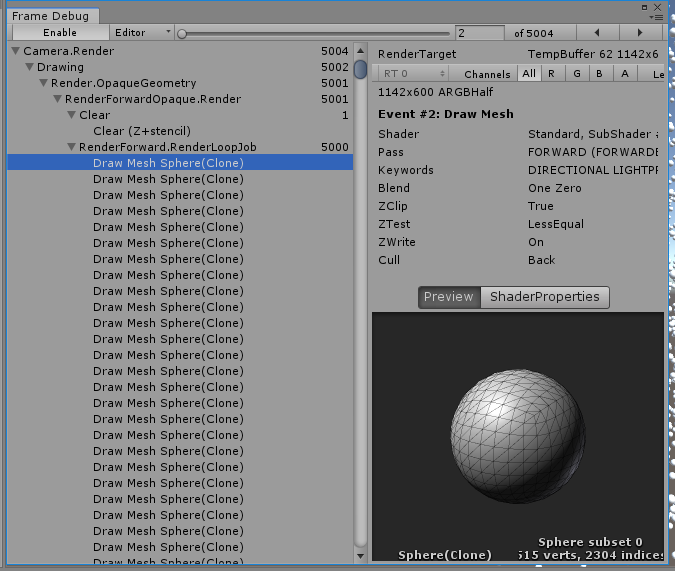
因Sphere无法动态合批,5000个Sphere就5000次DrawCall。
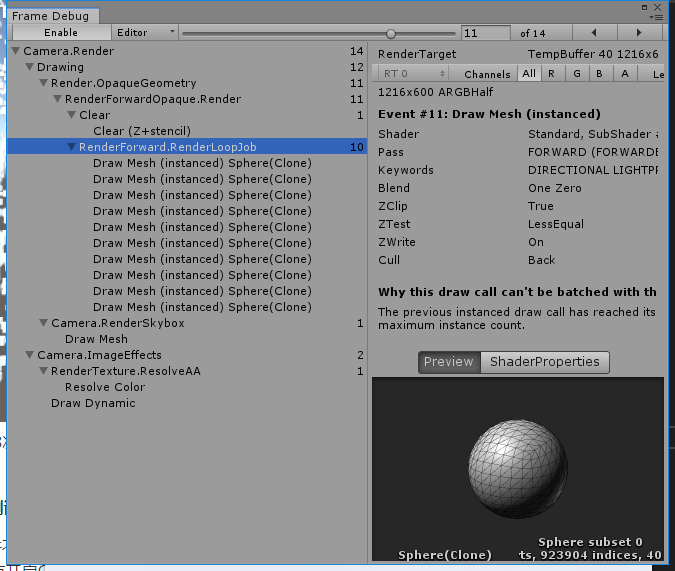
现在把材质中的Enable GPU Instancing选项开启:
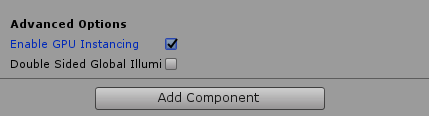
再次运行程序:
5000个Sphere被合批至10个DrawCall中处理了。被Instancing的Draw Call都被标记为了Draw Mesh(instanced)了。
1.3 什么是GPU Instancing
GPU Instancing是指由GPU和图形API支持的,用一个DrawCall同时绘制多个具有相同网格物体的技术。假如现在有一个包含大量模型的场景,而这些模型的网格数据都一样,不同的仅仅是世界空间下坐标不同。如果按照正常的渲染流程,DrawCall次数是和物件数量相同的,随着物件数量的上升CPU往GPU上传的数据就会越来越多,很快就会遇到性能的瓶颈。
使用GPU Instancing技术时,数据的上传是一次性打包上传至GPU的,紧接着调用GPU和图形的API利用这些数据绘制多个物件。Unity中的具体实现步骤如下:
- 将Per-Instance Data(世界矩阵,颜色等自定义变量)打包成Uniform Array,存储在Instance Constant Buffers中
- 对于可以使用Instancing的Batch,调用各平台图形API的Instancing DrawCall,为每个Instance生成一个不同的SV_InstanceID
- 在Shader中使用SV_InstanceID作为Uniform Array的索引来获取当前Instance的Per-Instance Data
GPU Instancing技术并不是总能提高性能的,如果场景中有大量使用相同材质和相同网格的物体并性能问题是由DrawCall次数过多导致的,这时使用GPU Instancing可以得到不错的性能提升。在实际的游戏项目中植被和树木是最适合使用的。这里要注意的是GPU Instancing是通过减少DrawCall来降低CPU开销的,但这同事也会为GPU带来额外的开销。适合的才是最好的,切勿沉迷性能优化无法自拔。
目前GPU Instancing支持的平台:
- DirectX11 and DirectX12 on Windows
- OpenGL Core 4.1+/ES3.0+ on Windows, macOS, Linux, iOS and Android
- Metal on macOS and iOS
- Vulkan on Windows, Linux and Android
- PlayStation 4 and Xbox One
- WebGL(requires WebGL 2.0 API)
使用GPU Instancing 技术注意事项:
- 使用Lightmap的物体无法使用Instancing
- 受不同Light Probe / Reflection Probe影响的物体无法使用Instancing
- 使用包含多个Pass的Shader物体,只有第一个Pass可以Instancing
- 前向渲染时,受多个光源影响的物体只有Base Pass可以Instancing, Add Passes不行
- Instancing 适用于MeshRenderer组件和Graphics.DrawMesh()
- 需要物件使用相同的Material和Mesh
- 需要把Shader改成Instanced的版本
- 当所有条件均满足的情况下,Instancing是自动进行的,并且优先级高于 Static/Dynamic Batching
2.1 让自定义Shader支持Instancing
首先我们新建一个简单的Shader:
Shader "Copper/LightingShader"
{
	Properties
	{
		_MainTex ("Texture", 2D) = "white" {}
	}
	SubShader
	{
		Tags { "RenderType"="Opaque" }
		LOD 100

		Pass
		{
			CGPROGRAM
			#pragma vertex vert
			#pragma fragment frag
			// make fog work
			#pragma multi_compile_fog

			#include "UnityCG.cginc"

			struct appdata
			{
				float4 vertex : POSITION;
				float2 uv : TEXCOORD0;
			};

			struct v2f
			{
				float2 uv : TEXCOORD0;
				UNITY_FOG_COORDS(1)
				float4 vertex : SV_POSITION;
			};

			sampler2D _MainTex;
			float4 _MainTex_ST;

			v2f vert (appdata v)
			{
				v2f o;
				o.vertex = UnityObjectToClipPos(v.vertex);
				o.uv = TRANSFORM_TEX(v.uv, _MainTex);
				UNITY_TRANSFER_FOG(o,o.vertex);
				return o;
			}

			fixed4 frag (v2f i) : SV_Target
			{
				// sample the texture
				fixed4 col = tex2D(_MainTex, i.uv);
				// apply fog
				UNITY_APPLY_FOG(i.fogCoord, col);
				return col;
			}
			ENDCG
		}
	}
}
接下来我们需要添加Instancing开启的编译指令:
#pragma vertex vert
#pragma fragment frag
// make fog work
#pragma multi_compile_fog
// 开启 Instancing支持
#pragma multi_compile_instancing
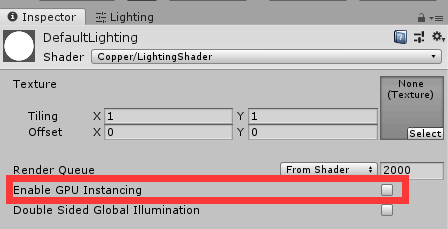
然后在Shader的Inspector中就会出现 Enable GPU Instancing 的选项:
勾选开启GPU Instancing后,运行程序后会得到一下结果:
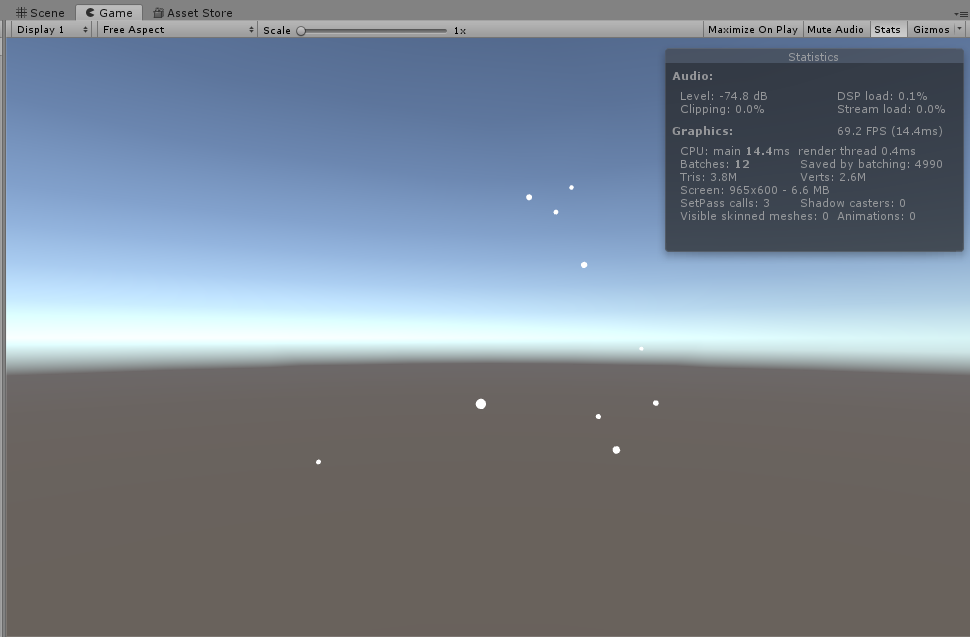
观察Stats发现渲染处理了5000个Sphere,最终合批为10次DrawCall。但我们却只在场景中观察到了10个Sphere。为什么5000个Sphere在渲染,而场景中只有10个Sphere?
2.2 UNITY_VERTEX_INPUT_INSTANCE_ID
上面的例子中5000个Sphere渲染,而只在场景中看到10个Sphere是因为GPU在处理Instancing的时候如果没有为每个Instancing指定唯一的Instance_id,那么GPU就会默认使用第一个。所以同一批次的Sphere都会出现在同一位置。我们修改一下Shader再来测试:
struct appdata
{
    UNITY_VERTEX_INPUT_INSTANCE_ID
    float4 vertex : POSITION;
    float2 uv : TEXCOORD0;
};

v2f vert (appdata v)
{
    v2f o;
    UNITY_SETUP_INSTANCE_ID(v)
    o.vertex = UnityObjectToClipPos(v.vertex);
    o.uv = TRANSFORM_TEX(v.uv, _MainTex);
    UNITY_TRANSFER_FOG(o,o.vertex);
    return o;
}
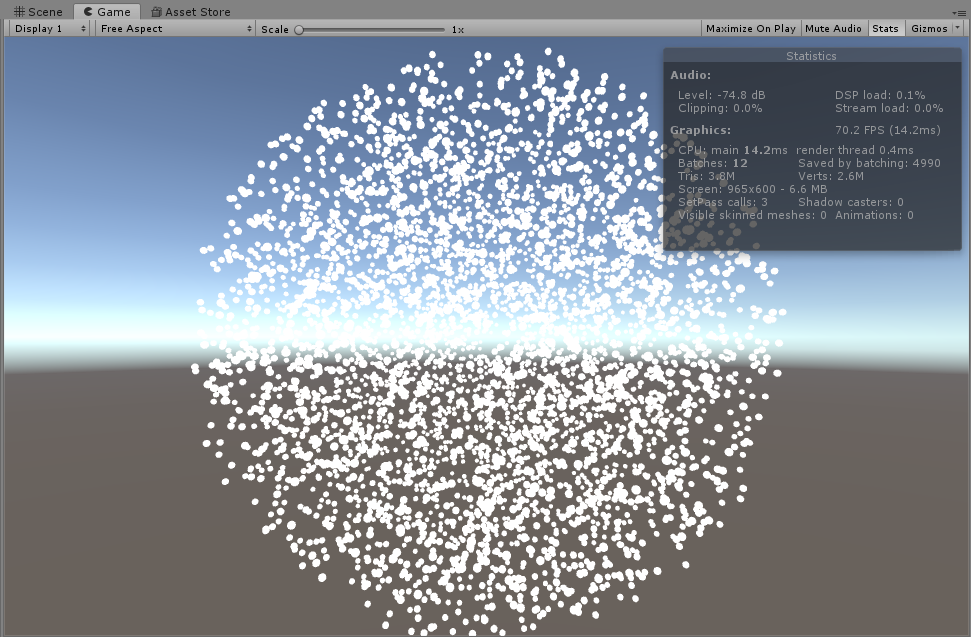
修改Shader后渲染结果恢复正常。下面我们来理解一下UNITY_VERTEX_INPUT_INSTANCE_ID和UNITY_SETUP_INSTANCE_ID。
Unity中Instancing相关的指令都定义在Unity安装目录\Editor\Data\CGIncludes\UnityInstancing.cgine文件中。
////////////////////////////////////////////////////////
// basic instancing setups
- UNITY_VERTEX_INPUT_INSTANCE_ID     //Declare instance ID field in vertex shader input / output struct.

- UNITY_SETUP_INSTANCE_ID        //Should be used at the very beginning of the vertex shader / fragment shader, so that succeeding code can have access to the global unity_InstanceID.Also procedural function is called to setup instance data.
UNITY_VERTEX_INPUT_INSTANCE_ID:在Shader输入/输出结构体中 声明一个Instance ID。
UNITY_SETUP_INSTANCE_ID:这个宏必须在Vertex Shader或Fragment Shader的一开始就调用,只有调用了这个宏以后,才可以在Shader中通过全局的InstanceID来访问到结构体数据。
2.3 GPU Instancing Batch Size
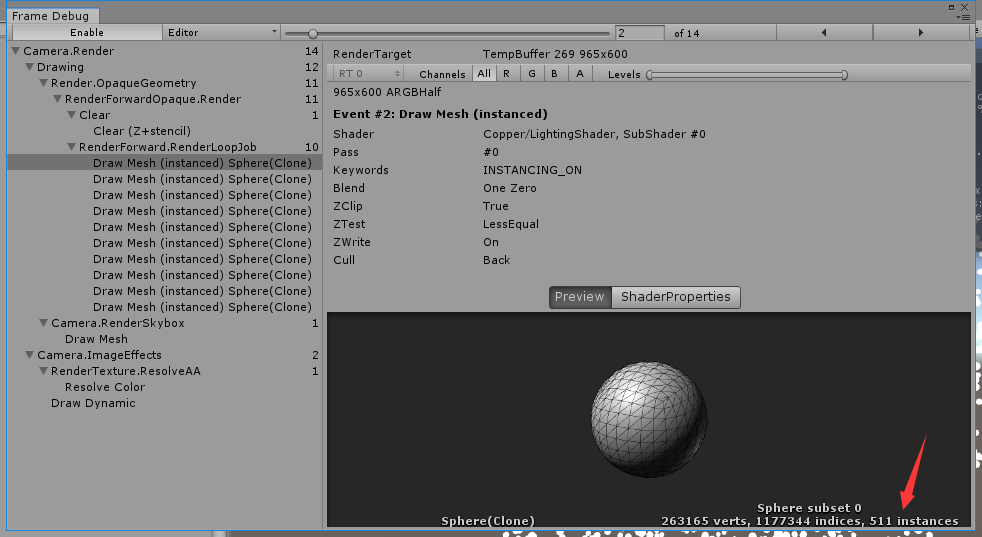
可以看到单次DrawCall的批次大小是511。这里Instancing Batch Size是通过UNITY_MAX_INSTANCE_COUNT 来定义的,Unity默认的大小是500。根据运行平台不同,这个最大批次数是变化的。也可以通过下面的指令进行修改:
#pragma instancing_options forcemaxcount:512
把最大批次数改为512,再次运行程序:
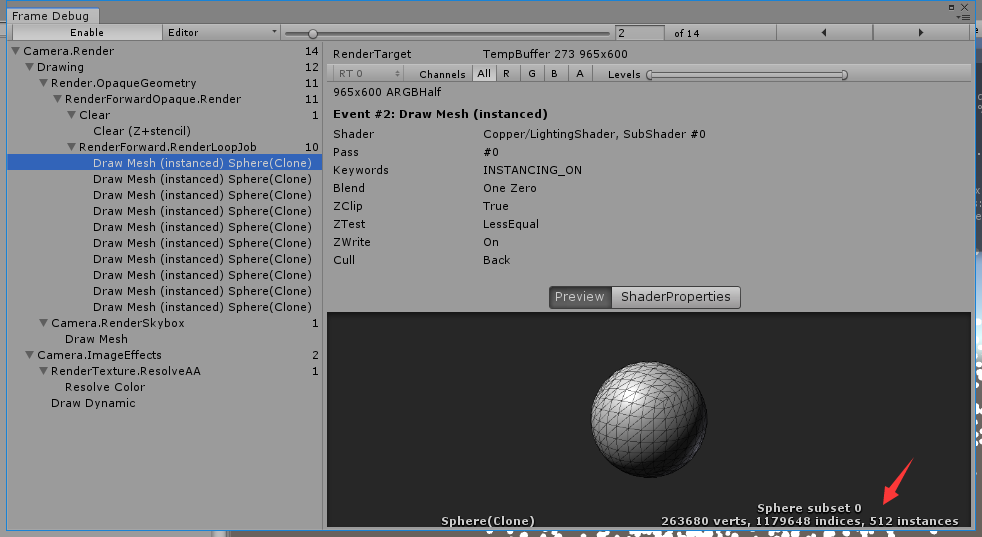
最大批次已经是512了,那么我们把最大批次修改为513会怎么样?
#pragma instancing_options forcemaxcount:513
运行后得到一个报错信息:

常量缓冲区UnityInstancing_PerDraw0的大小为 4104个16字节的条目,超过了最大4096个条目。
回到上面Instancing技术实现的说明:
将Per-Instance Data(世界矩阵,颜色等自定义变量)打包成Uniform Array,存储在Instance Constant Buffers中
Instance Data是存储在 ConstantBuffers(D3D )/Uniform Buffer Object(OpenGL)中的,那么也就是说一个批次能处理的Instance数量,取决于 ConstantBuffers/UBO的大小和Instancing 属性的多少。Windows下D3D的ConstantBuffer大小为64KB,那么基于上面的例子我们来算一下:
//上面的例子中在shader中将输入的结构体分配了Instance ID,之后Unity会在ConstantBuffers中存储两个矩阵:
// object-to-world : 世界坐标系下的矩阵 world-to-object:用于法线计算的矩阵
// 一个矩阵大小为 64byte
pSize = 64byte x 2 = 128byte
64KB = 64 x 1024 = 65536byte
max_count = 65536byte / 128byte = 512
所以批次最大Instance数为 512
OpenGl平台中UBO的大小通常只有ConstantBuffer大小的四分之一。
这里需要注意的是 UNITY_VERTEX_INPUT_INSTANCE_ID 使用的ConstantBuffer/UBO是单独的UnityInstancing_PerDraw0
2.4 UNITY_DEFINE_INSTANCED_PROP
修改一下Shader和脚本,为Shader添加一个颜色属性,在脚本中动态改变这个颜色值。
LightingShader.shader:
Shader "Copper/LightingShader"
{
	Properties
	{
		_MainTex ("Texture", 2D) = "white" {}
		_Color ("Main Color", Color) = (1,1,1,1)
	}
	SubShader
	{
		Tags { "RenderType"="Opaque" }
		LOD 100

		Pass
		{
			CGPROGRAM
			#pragma vertex vert
			#pragma fragment frag
			// make fog work
			#pragma multi_compile_fog
			#pragma multi_compile_instancing
			//#pragma instancing_options forcemaxcount:512

			#include "UnityCG.cginc"

			fixed4 _Color;

			struct appdata
			{
				UNITY_VERTEX_INPUT_INSTANCE_ID
				float4 vertex : POSITION;
				float2 uv : TEXCOORD0;
			};

			struct v2f
			{
				float2 uv : TEXCOORD0;
				UNITY_FOG_COORDS(1)
				float4 vertex : SV_POSITION;
			};

			sampler2D _MainTex;
			float4 _MainTex_ST;

			v2f vert (appdata v)
			{
				v2f o;
				UNITY_SETUP_INSTANCE_ID(v)
				o.vertex = UnityObjectToClipPos(v.vertex);
				o.uv = TRANSFORM_TEX(v.uv, _MainTex);
				UNITY_TRANSFER_FOG(o,o.vertex);
				return o;
			}

			fixed4 frag (v2f i) : SV_Target
			{
				// sample the texture
				fixed4 col = tex2D(_MainTex, i.uv);
				// apply fog
				UNITY_APPLY_FOG(i.fogCoord, col);
				return col*_Color;
			}
			ENDCG
		}
	}
}
GPUInstancing.cs:
using System.Collections;
using System.Collections.Generic;
using UnityEngine;

public class GPUInstancing : MonoBehaviour
{

    public Transform prefab;

    public int instances = 5000;

    public float radius = 50f;

    void Start()
    {
        MaterialPropertyBlock properties = new MaterialPropertyBlock();
        for (int i = 0; i < instances; i++)
        {
            Transform t = Instantiate(prefab);
            t.localPosition = Random.insideUnitSphere * radius;
            t.SetParent(transform);

            properties.SetColor("_Color", new Color(Random.value, Random.value, Random.value));
            t.GetComponent<MeshRenderer>().SetPropertyBlock(properties);
        }
    }
}
运行程序,观察GPUInstancing是否还有作用:
GPUInstancing无效了,很多时候我们是需要在Shader中定义一些属性供游戏运行时动态改变的。但在GPUInstancing阶段,如果没有给这些属性创建InstanceID的话,那么就无法成功合批。
修改LightingShader.shader:
Shader "Copper/LightingShader"
{
	Properties
	{
		_MainTex ("Texture", 2D) = "white" {}
		_Color ("Main Color", Color) = (1,1,1,1)
	}
	SubShader
	{
		Tags { "RenderType"="Opaque" }
		LOD 100

		Pass
		{
			CGPROGRAM
			#pragma vertex vert
			#pragma fragment frag
			// make fog work
			#pragma multi_compile_fog
			#pragma multi_compile_instancing
			//#pragma instancing_options forcemaxcount:512

			#include "UnityCG.cginc"

			//fixed4 _Color;

			struct appdata
			{
				UNITY_VERTEX_INPUT_INSTANCE_ID
				float4 vertex : POSITION;
				float2 uv : TEXCOORD0;
			};

			struct v2f
			{
				float2 uv : TEXCOORD0;
				UNITY_FOG_COORDS(1)
				float4 vertex : SV_POSITION;
			};

			sampler2D _MainTex;
			float4 _MainTex_ST;

			UNITY_INSTANCING_BUFFER_START(Props)
				UNITY_DEFINE_INSTANCED_PROP(float4, _Color)
			UNITY_INSTANCING_BUFFER_END(Props)

			v2f vert (appdata v)
			{
				v2f o;
				UNITY_SETUP_INSTANCE_ID(v)
				o.vertex = UnityObjectToClipPos(v.vertex);
				o.uv = TRANSFORM_TEX(v.uv, _MainTex);
				UNITY_TRANSFER_FOG(o,o.vertex);
				return o;
			}

			fixed4 frag (v2f i) : SV_Target
			{
				// sample the texture
				fixed4 col = tex2D(_MainTex, i.uv);
				// apply fog
				UNITY_APPLY_FOG(i.fogCoord, col);
				//return col*_Color;
				return col * UNITY_ACCESS_INSTANCED_PROP(Props, _Color);
			}
			ENDCG
		}
	}
}
结果成功合批。
UNITY_INSTANCING_CBUFFER_START(name) / UNITY_INSTANCING_CBUFFER_END
每个Instance独有的属性必须定义在一个遵循特殊命名规则的Constant Buffer中。使用这对宏来定义这些Constant Buffer。“name”参数可以是任意字符串。
UNITY_DEFINE_INSTANCED_PROP(float4, _Color)
定义一个具有特定类型和名字的每个Instance独有的Shader属性。这个宏实际会定义一个Uniform数组。
UNITY_ACCESS_INSTANCED_PROP(_Color)
访问每个Instance独有的属性。这个宏会使用Instance ID作为索引到Uniform数组中去取当前Instance对应的数据。
这里需要注意的是 UNITY_DEFINE_INSTANCED_PROP使用的ConstantBuffer/UBO是单独的UnityInstancing_Props。
所以合批上限是由UnityInstancing_PerDraw0和UnityInstancing_Props两个常量缓冲区同时决定的。
参考:
https://docs.unity3d.com/Manual/GPUInstancing.html
https://catlikecoding.com/unity/tutorials/rendering/part-19/
https://learnopengl.com/Advanced-OpenGL/Instancing